Posts

Showing posts from November, 2013

Android GridView Example

Image
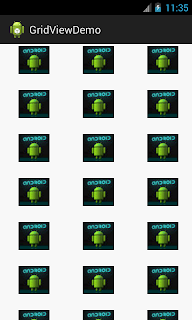
GridView is a main useful layout of android.We can store our images,videos,or icons in GridView items that  items is display as a two-dimensional, scrollable grid. To set the values in a GridView we are using a BaseAdapter. To get the position of the items in a GridView we are using gridview.setOnItemClickListener(). You can download source code here. 1.Create a new project named GridViewDemo. 2.Download sample images. Save the image files into the project's res/drawable. 3.Open the res/layout/activity_grid_view.xml file and insert the following: <?xml version="1.0" encoding="utf-8"?> <GridView xmlns:android="http://schemas.android.com/apk/res/android"     android:id="@+id/grid"     android:layout_width="fill_parent"     android:layout_height="fill_parent"     android:layout_marginLeft="07dp"     android:columnWidth="90dp"     android:gravity="center"     a

CountDown timer

CountDownTimer is used to Schedule a countdown until a given time, with regular notifications on given time intervals. CountDownTimer consist of four method shown below: start() is used to start the CountDownTimer. cancel() is used to cancel the CountDownTimer. onTick(long millisUntilFinished) is called in a regular interval onFinish() is called when the time is up. The calls to onTick(long millisUntilFinished) are synchronized to this object so that one call to onTick(long millisUntilFinished)  won't ever occur before the previous callback is complete. You can download source code here. Example of showing a one minute countdown below: package com.etr.countdowntimerdemo; import android.app.Activity; import android.os.Bundle; import android.os.CountDownTimer; import android.util.Log; import android.view.Menu; import android.view.View; import android.view.View.OnClickListener; import android.widget.Button; import android.widget.TextView; public c

Android spinner (drop down list) example

A Spinner is used to select a  value from a list.By default, the selected value is displayed on spinner.When we touch the spinner it will shows the all other available values,from which the user can select a new one. Spinner values can be set using ArrayAdapter or string array defined in a string resource file. You can download source code here. Create Android Project with name as SpinnerDemo  with package name "com.etr.drawshape". Create Activity with name as  DrawActivity. This is the code for DrawActivity. package com.etr.drawshape; import java.util.ArrayList; import android.app.Activity; import android.os.Bundle; import android.util.Log; import android.view.Menu; import android.view.View; import android.widget.AdapterView; import android.widget.AdapterView.OnItemSelectedListener; import android.widget.ArrayAdapter; import android.widget.Spinner; import android.widget.TextView; public class DrawActivity extends Activity { TextView text; Spinner

Android Graphics

Computer graphics is an art which is used to draw charts,lines,circles,etc by using electronic deveices and programming.Computer graphics consist of number of pixel.Pixel is the unit represented on the computer screen. Now we are going to draw Line,Circle,Rectangle,Oval by using onDraw(). You can download source code here. Override onDraw method To use this onDraw() first we need to inherit View class.parameter of onDraw() is Canvas.The Canvas class have methods for drawing text, lines, bitmaps, and many other graphics primitives.By using this onDraw() we can create custom user interface. Create Drawing Objects The android .graphics framework divided into two areas: Canvas  handles what to draw. Paint handles how to draw.           For Example, Canvas provides a method to draw a Oval, while Paint provides methods to define that Oval's color. Canvas has a method to draw a circle, while Paint defines whether to fill that circle  with a color or leave it

Android Library Project

Image
We can create a three type of project in android. Android project Library project Test project You can download source code here. You can create a library project where we can design classes,resources.We can share this library project to another android project. Generation of APK file is not possible with library project. For example,Facebook SDK is a library project.If we include this Facebook SDK we can use classes and resources of facebook. We can create library project in two ways, Creating a new library project and another way is converting existing android project into a library project. Creating a Library Project We can create a library project in the same way as you would a new android application project. Steps to create a new library project: Select File > New > Android Application Project. Enter the basic settings for the project, including Application Name as CreateLibraryProjectDemo, Project Name, Package Name as "com.etr.libraryproject

Android SeekBar

A SeekBar is a child class of ProgressBar that adds a draggable thumb. The user can hold the thumb and drag right or left to set the current progress level. SeekBar.OnSeekBarChangeListener  is used to notify of the user's actions. You can download source code here. Create Android Project with name as SeekBarDemo with package name "com.etr.seekbardemo". Create Activity with name as  SeekBarActivity. This is the code for SeekBarActivity. package com.etr.seekbardemo; import android.app.Activity; import android.os.Bundle; import android.util.Log; import android.view.Menu; import android.widget.SeekBar; import android.widget.SeekBar.OnSeekBarChangeListener; import android.widget.TextView; public class SeekBarActivity extends Activity { SeekBar seekBar; TextView progress; int value; @Override protected void onCreate(Bundle savedInstanceState) { try { super.onCreate(savedInstanceState); setContentView(R.layout.activity_seek_bar); pro

Android Gestures

Image
Gesture is an user interface in Android. Gesture is a shape,which is drawn on free hand in touch screen. GestureLibrary is used to recognize user-defined gesture. You can download source code here. create a user-defined gesture using Gesture builder.Refer to the below screenshot for creating Gusture. By default gusture will save on "storage/sdcard/gesture" folder. Create a new folder named "raw" in "res" folder. Copy that gesture file and paste it in raw folder. Refer to the below screenshot for adding gusture in our application. In GestureOverlayView draw the pattern similar to already added gesture in application. Create Android Project with name as GestureDemo with package name "com.etr.gesturedemo". Create Activity with name as GestureActivity. This is the code for GestureActivity. package com.etr.gesturedemo; import java.util.ArrayList; import android.app.Activity; import android.gesture.Gesture; import andr

Get Account Details using AccountManager in Android

AccountManage is used to manage the online Accounts like Facebook,Google,etc. AccountManager is used, Manage the available accounts. Add the new account. Authendicate the accouts. You can download source code here . Create Android Project with name as AccountManagerDemo with package name "com.etr.accountmanagerdemo". Create Activity with name as AccountManagerActivity. This is the code for AccountManagerActivity. package com.etr.accountmanagerdemo; import android.accounts.Account; import android.accounts.AccountManager; import android.app.Activity; import android.os.Bundle; import android.util.Log; import android.view.Menu; import android.view.View; import android.view.View.OnClickListener; import android.widget.Button; import android.widget.EditText; import android.widget.Toast; public class AccountManagerActivity extends Activity { Button details; EditText packageName; @Override protected void onCreate(Bundle savedInstanceState) {

Custom Transition in Android

We can create custom transition through overridePendingTransition.overridePendingTransition Call immediately after one of the flavors of  finish()  or  startActivity(Intent) to specify an explicit transition animation to perform next. Create Android Project with name as "TransitionDemo" with package name "com.etr.transitiondemo". Create Activity with name as "TransitionActivity". This is the code for TransitionActivity. You can download source code here . package com.etr.transitiondemo; import android.app.Activity; import android.content.Intent; import android.os.Bundle; import android.util.Log; import android.view.Menu; import android.view.View; import android.view.View.OnClickListener; import android.widget.Button; public class TransitionActivity extends Activity { Button button; @Override protected void onCreate(Bundle savedInstanceState) { try { super.onCreate(savedInstanceState); setContentView(R.layout.activity_t

Encryption/Decryption in Android

Encrytion is translation of data into a secret code. Encryption is the best way to achieve data security. To read an encrypted file, you must have access to a password or secret key that enables you to decrypt it. Unencrypted data is called plain text  and encrypted data is called cipher text. Create Android Project with name as "EncryDemo" with package name "com.etr.encrydemo". Create Activity with name as "MainActivity". This is the code for MainActivity. You can download source code here. package com.etr.encrydemo; import java.io.IOException; import java.security.GeneralSecurityException; import javax.crypto.Cipher; import javax.crypto.SecretKey; import javax.crypto.SecretKeyFactory; import javax.crypto.spec.PBEKeySpec; import javax.crypto.spec.PBEParameterSpec; import android.app.Activity; import android.os.Bundle; import android.util.Log; import android.view.Menu; import android.view.View; import android.view.View.OnClickListe

Menu in Android

Menus are a common user interface component for android applications.To provide a familiar and consistent user experience to the user, you should use the Menu APIs to present user actions and other options in your activities. Different menu types in android 1.Context Menus 2.Options menus 3.Sub menus Create Android Project with name as "MenuDemo" with package name "com.etr.menudemo". Create Activity with name as "MenuActivity". This is the code for MenuActivity. package com.etr.menudemo; import android.os.Bundle; import android.app.Activity; import android.content.Intent; import android.view.Menu; import android.view.MenuItem; public class MenuActivity extends Activity { @Override protected void onCreate(Bundle savedInstanceState) { super.onCreate(savedInstanceState); setContentView(R.layout.activity_menu); } @Override public boolean onCreateOptionsMenu(Menu menu) { // Inflate the menu; this adds items to the action